Creating Your First Stack#
Setting up a Stack with all of its layers is a tedious excersise it TTW (Through-The-Web) configuration.
Thankfully there's another AWS tool called CloudFormation that lets us quickly configure a basic Plone stack with the most common layers configured.
If you navigate to CloudFormation in the AWS console you'll be presented with
the option to create a Stack.
Confusingly, a CloudFormation Stack is not the same thing as an OpsWorks Stack,
but the former is what we use to automate the creation of the latter so we can use the terms a bit interchangeably.
You'll want to download the following file from GitHub: https://raw.githubusercontent.com/alecpm/opsworks-web-python/master/plone_buildout/examples/zeoserver-stack.template
And use the "Upload a template to Amazon S3" option to upload the above file which provides a basic ZEO server stack configuration [1].
You may want to select the EC2 region for you stack before creating the stack, but if you don't you can always clone the stack into another region later. The stack creation will take a few minutes; once it succeeds you can navigate to the OpsWorks control panel to see your new Stack. [2]
The CloudFormation setup creates a stack outside of a VPC (Virtual Private Cloud), which is probably not ideal since some instance options are not available outside of a VPC.
If you want the stack to use a VPC or to be in a different EC2 region than you initially ran CloudFormation from, then you can clone the Stack from the OpsWorks Dashboard to set your desired region and VPC settings.
There are a few important settings which CloudFormation is not able to manage and have to be modified after stack creation.
The two Apps (Plone Instances and Zeoserver) should be edited to set the Data Source to
None (this setting is useful for a Relstorage configuration, but does
nothing for a ZEO server configuraiton).
You will probably want to use your own buildout repository in these App configurations, but any buildout you use should probably be cloned from the one used in this demo configuration because it provides a number of buildout parts and variables that the deployment recipes expect to be in place:
alecpm/opsworks_example_buildouts
You'll need to provide some additional configuration (Chef Attributes) in the form of the Stack Custom JSON which can be edited in
the Stack Settings control panel.
The following should be a reasonable starting point
{
    "plone_instances" : {
        "nfs_blobs" : true
    },
    "deploy" : {
        "plone_instances" : {
            "buildout_extends": ["cfg/sources.cfg"],
            "buildout_additional_config": "[client1]\nuser=admin:**change-me**"
        },
        "zeoserver" : {
            "buildout_extends": ["cfg/sources.cfg"]
        }
    }
}
Note the buildout_additional_config attribute, which allows you to insert arbitrary configuration and
overrides into the generated buildout deploy.cfg.
In this case, it's used to set a custom admin password for your new plone instance.
There are similar buildout_parts_to_include and buildout_extends attributes which allow you to customize the parts used
for a particular deploy and any additional configuration files to include.
For example, typically I will use a include a cfg/production_sources.cfg in my production stack which sets revision/tag
pins for any external source dependencies in for production deployments.
You may also wish to set the OpsWorks Agent Version to Use latest version, and choose a Hostname Theme for fun.
Note that this default configuration uses a blob directory shared over NFS.
That's not necessary if you're going to use a single instance configuration that you plan never to grow (perhaps for a staging server), but if you think you might want multiple servers running ZEO clients, then starting out with a network shared storage for blobs is probably the best way to go.
You could also configure shared blobs using the GlusterFS distributed filesystem (this can be tricky and is only recommended if you are already familiar with GlusterFS), S3-fuse Fs (slow), or serve them from the ZEO Server or RelstorageDB.
If you do want a single server configuration with no network blob share, then you will need to add a line of configuration for the blob storage location, e.g.:
"plone_blobs": {"blob_dir": "/mnt/shared/blobs/blobstorage"},
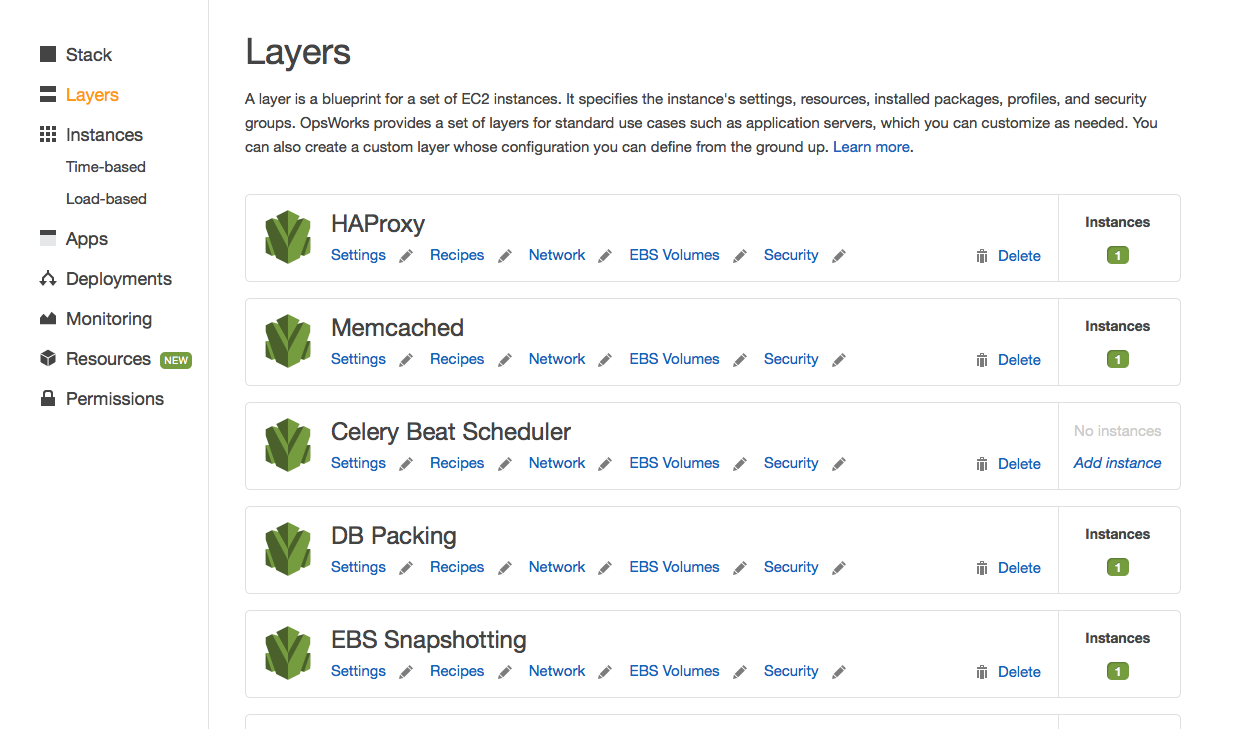
You may also want to change the load balancer stats access password in the HAProxy layer.
By default, each server is protected by a firewall that only allows access to specific services defined by that instances layers.
Our layers are heavily customized, so the defaults aren't always sufficient.
You'll want to ensure that the servers can all communicate with one another over all desired ports, and you'll probably want to be able to bypass the default firewall from specific external IP addresses to get direct access to your ZEO Clients, etc.
The simplest way to do that is to go to the Security tab for each of the Layers and add the default security group to each of them. [3]
Adding An Instance#
At this point you can navigate to the Instances control panel and create an instance in a particular layer.
Once you've defined your first instance you can assign it to additional layers.
Once you pick an appropriate instance size (t2.micro is fine for playing around), you should be able to use the instance defaults, though the initial EBS volume size is something you may want to configure later if you don't intend to use separate mount points for data storage.
Once you've created the first instance you'll want to add it other layers using the Existing OpsWorks tabs.
You will probably want to skip the EBS Snapshotting layer for now, and if you disabled NFS you should skip the Shared Blobs layer too.
By default the Zeoserver layer and the Shared Blobs layer both create and attach EBS volumes to any instances assigned
to them (for the filestorage and NFS shared blobstorage respectively).
This is optional when using an EBS backed instance with an adequately sized root volume, but is mandatory when using instance store backed instances.
Traditionally, instance store backed instances had some performance and cost advantages, but those advantages have largely vanished recently, and EBS instances can stop and start much faster after initial instance creation.
For testing you may want to delete the EBS volume resources from those layers before starting your instance.
Note
I still like using instance store instances with sepearate attached EBS volumes because those instances make no promises about retaining configuration changes outside of the explicitly mounted EBS volumes, and that keeps me from twiddling server configuration in ways that might not be repeatable.
They also help avoid some I/O concurrency issues you may run into with an all EBS configuration, and allow more straighforward vertical scaling.
Now you should be able to start your instance, and after a little while (depending on the instance size), you will have a server up and running.
This Zope instance won't have a Plone site yet, so having added the default security group earlier to allow yourself
direct access to the ZEO clients will come in handy here.
Your instance should have a public IP address (the frontend layer assigns an Elastic IP by default, though you could manually transfer one in if you were moving an existing EC2 server).
You should be able to access the first ZEO client at port 8081 and create your Plone site.
Caveats#
There are a few restrictions on what can and can't be done when in of OpsWorks which can occasionally cause annoyance:
Instances can only be added to layers when the Instances are stopped,you cannot add additional Layers of functionality to an already running Instance. There are workarounds for this limitation (such as adding recipes or package dependencies to existing layers and re-running the relevant phases), but it can be frustrating.
You cannot change the security groups of a running instance, and changes to a Layer's security groups don't apply to running instances. Thankfully, any changes to the firewall rules for a security group will affect all running instances in that group. It's best to make sure your Layers assign all the security groups you might need before starting an instance.
A setup or deploy may fail because of problems accessing Repositories or PyPI packages. If the initial instance setup fails, it is not generally necessary to stop, wait and then start the instance (which can take a long time), you generally can re-run the
setupphase from the Stack panel using theRun Commandbutton.Downloading public packages from PyPI and https://dist.plone.org/ is often the slowest part of initial instance setup. It can help tremendously to have a tarball of all required eggs stored in a public S3 url, you can use the Custom JSON to tell OpsWorks to fetch this tarball before running the buildout. The configuration goes under the
deploy[app_name]key and looks like [4]"buildout_cache_archives" : [{"url" : "https://my-bucket.s3.amazonaws.com/my-eggs-archive.tgz", "path" : "shared"}]