31. Testing in Plone#
It's a good practice to write tests for the main requirements of a project. The requirements are getting clearer and a path for the development is pointed.
This chapter is meant as a starting point for testing in Volto.
31.1. Testing permissions, features and UI topics#
We already added a content type talk. Let's write a test 'An editor can add a talk'.
Install cypress with
yarn add cypress cypress-axe cypress-file-upload --dev -W
Add a yarn script in your
package.json"scripts": { ... "cypress:open": "CYPRESS_API=plone cypress open" },
Get some helper functions for an autologin, etc. from Volto.
Create a folder
cypress/integration/with a filecontent.js
content.js:
describe('Add talk tests', () => {
beforeEach(() => {
// given a logged in editor and the site root
cy.autologin();
cy.visit('/');
cy.waitForResourceToLoad('@navigation');
cy.waitForResourceToLoad('@breadcrumbs');
cy.waitForResourceToLoad('@actions');
cy.waitForResourceToLoad('@types');
cy.waitForResourceToLoad('?fullobjects');
});
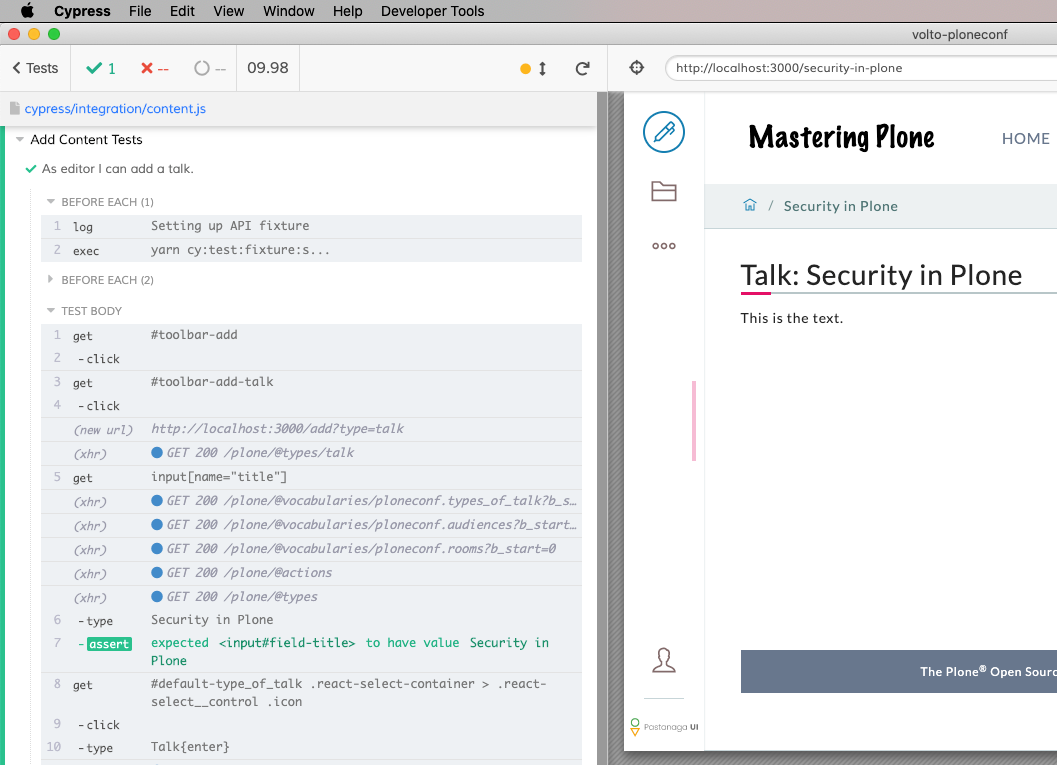
it('As editor I can add a talk.', function () {
// when I add a talk with title, type and details
cy.get('#toolbar-add').click();
cy.get('#toolbar-add-talk').click();
cy.get('input[name="title"]')
.type('Security in Plone')
.should('have.value', 'Security in Plone');
cy.get(
'#default-type_of_talk .react-select-container > .react-select__control .icon',
)
.click()
.type('Talk{enter}');
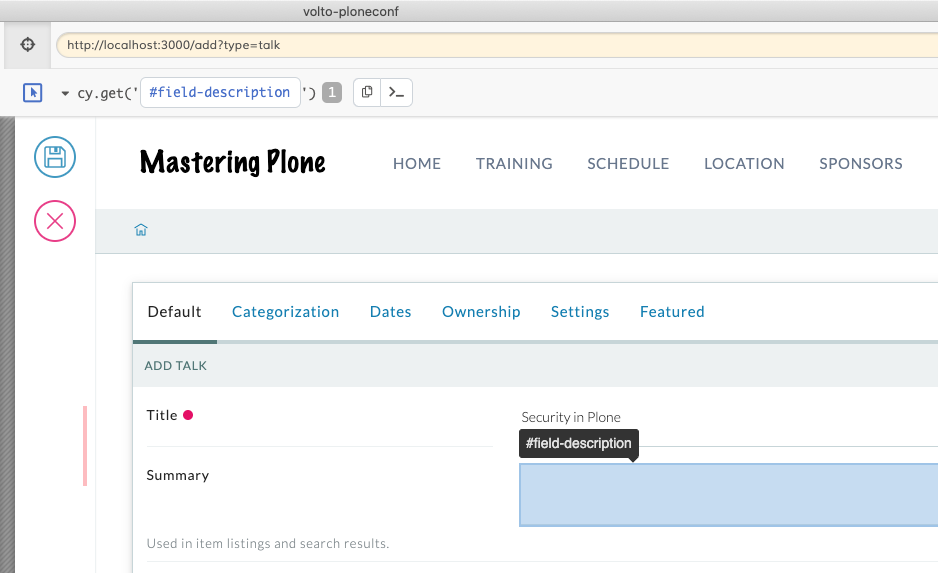
cy.get('#default-details .public-DraftEditor-content')
.type('This is the text.')
.get('span[data-text]')
.contains('This is the text.');
cy.get('#toolbar-save').click();
// then a new talk should have been created
cy.url().should('eq', Cypress.config().baseUrl + '/security-in-plone');
cy.get('body').contains('Security in Plone');
cy.get('body').contains('This is the text.');
});
});
Go to your backend folder, open Makefile and add test commands:
# Volto cypress tests

.PHONY: start-test-backend
start-test-backend: ## Start Test Plone Backend
  ZSERVER_PORT=55001 CONFIGURE_PACKAGES=plone.app.contenttypes,plone.restapi,kitconcept.volto,kitconcept.volto.cors APPLY_PROFILES=plone.app.contenttypes:plone-content,plone.restapi:default,kitconcept.volto:default-homepage ./bin/robot-server plone.app.robotframework.testing.PLONE_ROBOT_TESTING

.PHONY: start-test-frontend
start-test-frontend: ## Start Test Volto Frontend
  cd ../volto-ploneconf; RAZZLE_API_PATH=http://localhost:55001/plone yarn build && NODE_ENV=production node build/server.js

.PHONY: start-test
start-test: ## Start Test
  cd ../volto-ploneconf; yarn cypress:open
Start the test backend
make start-test-backend
Start the test frontend
make start-test-frontend
Start cypress
make start-test
You can step through each command of a test.
Cypress provides a helper to find the right selector.
31.2. Testing the rendering of a component#
Create a
Talk.test.jsfile as a sibling of Talk.jsxThe component to test is
Talk. We let the test render this component with some props:
 1import React from 'react';
 2import renderer from 'react-test-renderer';
 3import { Provider } from 'react-intl-redux';
 4import configureStore from 'redux-mock-store';
 5import Talk from './Talk';
 6const mockStore = configureStore();
 7
 8const store = mockStore({
 9  intl: {
10    locale: 'en',
11    messages: {},
12  },
13});
14
15test('renders a talk view component with only required props', () => {
16  const component = renderer.create(
17    <Provider store={store}>
18      <Talk
19        content={{
20          title: 'Security of Plone',
21          description: 'What makes Plone secure?',
22          type_of_talk: { title: 'Talk', token: 'Talk' },
23        }}
24      />
25    </Provider>,
26  );
27  const json = component.toJSON();
28  expect(json).toMatchSnapshot();
29});
If you now run the test, a snaphot of the rendered component will be created.
yarn test
See the snaphot in folder __snapshots__.
If this is a rendering you expected, you are good to go.
// Jest Snapshot v1, https://goo.gl/fbAQLP exports[`renders a talk view
component with only required props 1`] = `
<div className="ui container" id="page-talk">
  <h1 className="documentFirstHeading">Talk : Security of Plone</h1>
  <div className="ui right floated segment" />
  <p className="documentDescription">What makes Plone secure?</p>
</div>
`;