Deploying Changes#
Now that you've got one or more Instances up and running, you may need to update the code on them. Traditionally, you'd SSH into the server pull in new changes from the repositories, run buildout, and restart ZEO clients if necessary.
With OpsWorks, you click a deploy button and everything is handled automtically.
What happens when you click the Deploy button for an OpsWorks App?
The instance looks to see if there's a new revision on the App's buildout repository (accounting for the branch or revision setting in the App configuration).
If there are changes to the repository, then it makes a new clone of the repository and puts it in a directory under
releasesnamed by the checkout timestamp. It then generates a newdeploy.cfgbased on the Stack Configuration, including information about currently running instances and layers. Then it runs bootstrap and buildout with that configuration. If the process succeeds, it symlinks therelease/$timestampdirectory tocurrentand restarts the ZEO clients.If there are no changes to the repository, then it generates a new
deploy.cfgbased on the current Stack configuration. If that file differs from the existing deploy.cfg (e.g. because of changes in the Stack's Custom JSON), then it will re-run buildout, and - if the buildout succeeds - restart the ZEO clients.If there are no changes to the repository, and the new
deploy.cfgis identical to the prior version, then it checks for analways_buildout_on_deployflag in the Stack'sdeploy[appname]Custom JSON. If that flag is true, then it runs buildout and restarts the ZEO clients on success. This is useful if you are deploying changes from external repositories pulled in by mr.developer, even when the buildout repository itself hasn't changed.
Steps 1 and 2 are essentially a Capistrano style deployment familiar from the Rails world.
This process allows for explicit rollback of deployed code to prior versions at any time.
Steps 3 and 4 are buildout specific and don't support rollbacks in the same way.
You can run a deploy on a single Instance or on many at once. The deploy will run in parallel on all Instances selected.
Instances that have the deployed App/Layer assigned will go through the process above, other instances will run a generic deploy phase (which allows those Instances to update their configuration in parallel).
This process creates a good chance that all your ZEO clients will be restarted at once, causing a temporary outage and a slow site.
If you have multiple Instances running ZEO clients you can deploy to them one at a time, to avoid an outage.
You can also configure your Stack to do rolling deploys by adding a restart_delay in seconds to your Custom
JSON under the top-level plone_instances key.
When that is set, the deploy will wait that amount of time between each ZEO client restart for a given Instance.
If you use Travis CI to provide automatic testing of your buildout/application, you can configure Travis to automatically launch an OpsWorks deploy for a specific Stack and Application on successful builds (see https://docs.travis-ci.com/user/deployment/opsworks/).
Instance Sizes#
There are many available Instance types on EC2, which makes choosing the correct Instance sizes for your application cluster a bit of an art.
The OpsWorks recipes will automatically factor in the CPU capacity of the Instances you choose for your ZEO client Layers (using their Elastic Compute Unit/Core counts) to determine automatically how many ZEO clients to create per Instance.
You can fine tune that calculation further by setting the per_cpu attribute under the plone_instances key in the Stack Custom JSON.
You can also tweak the zodb_cache_size, and zserver_threads to help tune RAM usage for your ZEO clients.
Scaling#
If you've setup a distributed blob storage (whether with NFS/GlusterFS, S3FS, ZEO or Relstorage), adding more ZEO clients is a simple matter of defining a new instance assigned only to your Plone Instances application Layer and starting it.
In addition to the normal 24/7 instances, you can define time-based Instances that automatically add instances during regular peak traffic periods.

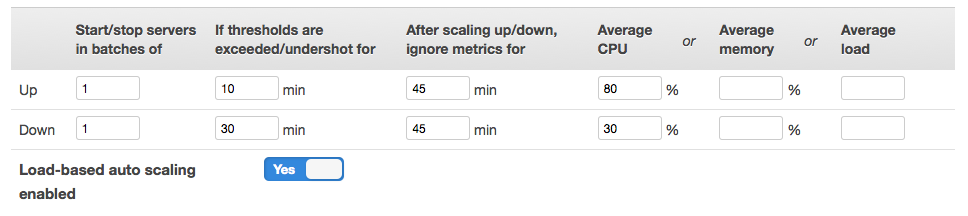
Alternatively, you can define load-based instances which automatically start up and shutdown based on the average CPU usage, Load, or RAM usage of existing instances in the layer.
Any new instances will automatically discover your existing ZEO server. Any load balancers will automatically discover any new ZEO clients.
The Stack reconfiguration will happen automatically whenever an instance goes up or down.
You can view the HAProxy ZEO client status by visiting the password protected url /balancer/stats for your frontend instance IP(s).
For a high traffic site that requires a high availability configuration, it may also make sense to run the frontend HAProxy layer on multiple Instances in different Availablilty Zones.
You would need to route external traffic to those servers using an adaptive DNS service or Amazon's Elastic Load Balancer.
Configuration#
The Stack Custom JSON configuration offers a number of entry points for customizing the default Stack without needing to learn any Chef or Ruby.
Those configuration parameters are thoroughly documented in the Plone Buildout cookbook README, and the full list of Plone Buildout cookbook specific attributes is in attributes/default.rb.
Any of those attributes can be customized via the Stack Custom JSON.
For example, the nginx_plone["additional_configuration"] and nginx_plone["additional_servers"]
may be the most generically useful items for frontend configuration.
The recipes and example buildout also include optional support for running and configuring a Solr search server and setting up a Celery task queue for running asynchronous jobs using collective.celery.