TTW Theming I: Introduction To Diazo Theming#
In this section you will:
Use the "Theming" control panel to make a copy of Plone's default theme (Barceloneta)
Customize a theme using Diazo rules
Customize a theme by editing and compiling Less files
Topics covered:
Diazo and plone.app.theming
The Default Plone Theme (Barceloneta)
The "Theming Tool"
Building CSS in the "Theming Tool"
CSS classes of the
<body>elementConditionally activating Diazo rules
Installation#
We will use a Plone pre-configured Heroku instance.
Once deployed, create a Plone site.
Two Approaches To Theming#
There are two main approaches to creating a custom theme:
Copying the default Barceloneta theme
Inheriting from the default Barceloneta theme.
In this section we will work with the first approach
The second one will be covered in detail in TTW Theming II: Create A Custom Theme Based On Barceloneta.
What Is Diazo?#
Diazo is a theming engine used by Plone to make theming a site easier.
At it's core, a Diazo theme consists of an HTML page and rules.xml file containing directives.
Note
You can find extended information about Diazo and its integration package plone.app.theming
in the official docs for Diazo and
plone.app.theming.
Principles#
For this part of the training you just need to know the basic principles of a Diazo theme:
Plone renders the content of the page.
Diazo rules inject the content into any static theme.
Copy Barceloneta Theme#
To create our playground we will copy the existing Barceloneta theme.
Go to the Theming control panel.
You will see a list of the available themes. In a bare new Plone site, you will see something like this:
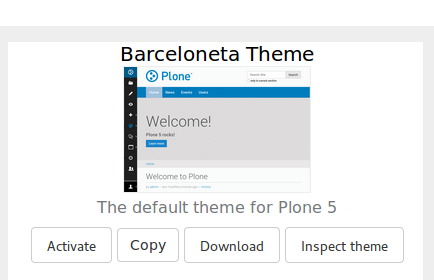
Look for the Barceloneta Theme and click the Copy button next to it.
Insert "My theme" as the name and click the checkbox to immediately enable the theme:
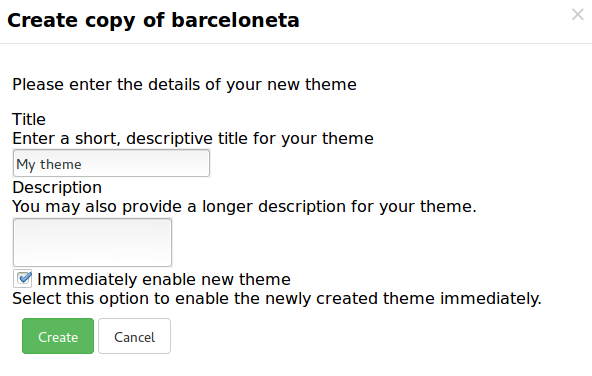
Click on Create and you get redirected to your new theme's inspector:
Anatomy Of A Diazo Theme#
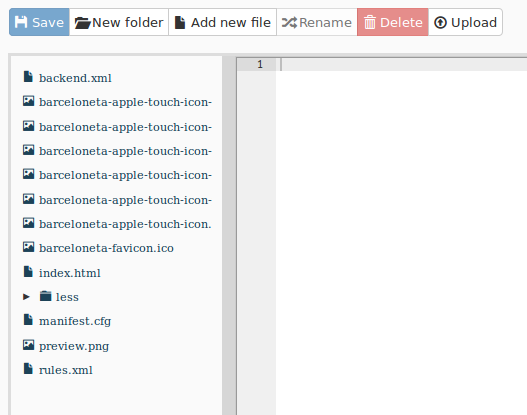
The most important files:
manifest.cfg: contains metadata about the theme (manifest reference);rules.xml: contains the theme rules (rules reference);index.html: the static HTML of the theme.
Exercise 1 - Inspecting The manifest.cfg#
To better understand how your theme is arranged start by reading the manifest.cfg file.
In the theming tool, open the manifest.cfg spend a minute or two looking through it, then see if you can answer the questions below.
Where are the main rules located for your theme?
What property in the
manifest.cfgfile defines the source CSS/Less file used by the theme?What do you think is the purpose of the
prefixproperty?
CSS Classes For The <body> Element#
As you browse a Plone site, Plone adds rich information about your current context.
This information is represented as special classes in the <body> element.
Information represented by the <body> classes includes:
the current user role and permissions,
the current content-type and its template,
the site section and sub section,
the current subsite (if any),
whether this is a frontend view,
whether icons are enabled.
<body> Classes For An Anonymous Visitor#
Below you can see an example of the body classes for a page named "front-page", located in the root of a typical Plone site called "acme":
<body class="template-document_view
             portaltype-document
             site-acme
             section-front-page
             icons-on
             thumbs-on
             frontend
             viewpermission-view
             userrole-anonymous">
<body> Classes For A Manager#
And here is what the classes for the same page look like when viewed by a manager who has logged in:
<body class="template-document_view
             portaltype-document
             site-acme
             section-front-page
             icons-on
             thumbs-on
             frontend
             viewpermission-view
             userrole-member
             userrole-manager
             userrole-authenticated
             plone-toolbar-left
             plone-toolbar-expanded
             plone-toolbar-left-expanded">
Notice the addition of userrole-manager.
Exercise 2 - Discussion About The <body> Classes#
Look back at the <body> classes for a manager. Can you answer the following questions?
What other roles does the manager have?
Can you see other differences?
What do you think the
plone-toolbar-expandedclass does?
Custom Rules#
Let's open the default rules file rules.xml.
You will see all the rules that are used in the Barceloneta theme right now.
For the time being let's concentrate on how to hack these rules.
Conditionally Showing Content#
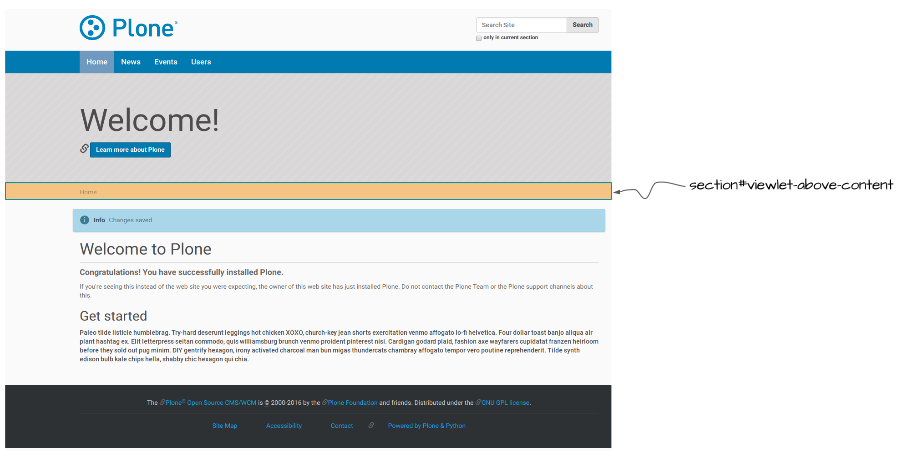
Suppose that we want to make the "above content" block (the one that contains breadcrumbs) conditional, and show it only for authenticated users.
In the rules.xml find this line:
<replace css:content="#viewlet-above-content" css:theme="#above-content" />
This rule states that the element that comes from the content (Plone) with the id #viewlet-above-content must replace the element with the id #above-content in the static theme.
We want to hide it for anonymous users (hint: we'll use the <body> classses we discussed above).
The class we are looking for is userrole-authenticated.
Add another attribute to the rule so that we produce this code:
<replace
    css:if-content="body.userrole-authenticated"
    css:content="#viewlet-above-content"
    css:theme="#above-content" />
The attribute css:if-content allows us to put a condition on the rule based on a CSS selector that acts on the content.
In this way the rule will be applied only if the body element has the class .userrole-authenticated.
We will learn more about Diazo rules in TTW Theming II: Create A Custom Theme Based On Barceloneta.
Customize CSS#
In the theme editor open the file
less/barceloneta.plone.less. This file is the main Less file as specified in themanifest.cfg.Add your own customization at the bottom of the file, like:
body {
    background-color: red;
    font-size: 18px;
}
Note
Normally you would place this in a separate file to keep the main one clean but for this example it is enough.
Click the buttons Save and Build CSS.

Go back to the Plone site and reload the page: voilá!
Warning
At the moment you need to "Build CSS" from the main file, the one declared in the manifest (in this case less/barceloneta.plone.less).
So, whatever Less file you edit, go back to the main one to compile.
This behavior will be improved in the future, but for now remember this simple rule.