20. Registry, control panels and vocabularies#
In this part you will:
Store custom settings in the registry
Create a control panel to manage custom settings
Create options in fields as vocabularies
Training story: Assign talks to rooms
Topics covered:
plone.app.registry
Vocabularies
Control panels
Checkout ploneconf.site at tag "events":
git checkout events
The code at the end of the chapter:
git checkout vocabularies
More info in The code for the training
20.1. Introduction#
Do you remember the fields audience and type_of_talk in the talk content type?
The schema previously hard-coded several options for selection.
Next, you will add a field to assign talks to a room. The room names change each year for the conference, so site administrators need to edit them.
Additionally, admins should be able to edit the options for audience and type_of_talk, making it possible to add options like Lightning Talks!
By combining the registry, a control panel and vocabularies you can make rooms configurable options.
To achieve this you first need to get to know the registry.
20.2. The registry#
The registry stores and retrieves values in records. Each record consists of the actual value, along with a field that describes the record in more detail. You can interact with the registry using Python dictionary-style operations to get and set values.
Since Plone 5 the registry stores all global settings. Plone provides the registry through plone.registry and offers a user interface for interaction via plone.app.registry.
Most settings in Site Setup reside in the registry. You can modify them directly through its UI.
Open http://localhost:8080/Plone/portal_registry and filter for displayed_types.
Modify the content types shown in the navigation and site map directly.
These values match those in http://localhost:8080/Plone/@@navigation-controlpanel, where the form is customized for better usability.
Note
This UI for the registry is not yet available in the frontend.
20.3. Registry records#
In Creating a dynamic front page with Volto blocks you already added a criterion usable for listing blocks in profiles/default/registry/querystring.xml.
This setting is stored in the registry.
Examine the existing values in the registry.
Go to http://localhost:3000/controlpanel/navigation and add talk to the field Displayed content types.
Talks in the root will now show up in the navigation.
This setting is stored in the registry record plone.displayed_types.
20.4. Accessing and modifying records in the registry#
In Python you can access the registry record with the key plone.displayed_types via plone.api.portal.
It holds convenience functions to get and set a record:
from plone import api

api.portal.get_registry_record('plone.displayed_types')
api.portal.set_registry_record('plone.smtp_host', 'my.mail.server')
For more information see plone.api.portal documentation: Get plone.app.registry record.
The access of the registry by zope.component.getUtility is often seen in code from before the time of plone.api.
from plone.registry.interfaces import IRegistry
from zope.component import getUtility

registry = getUtility(IRegistry)
displayed_types = registry.get('plone.displayed_types')
The value of the record displayed_types is the tuple ('Image', 'File', 'Link', 'News Item', 'Folder', 'Document', 'Event', 'talk').
20.5. Custom registry records#
Now add custom settings:
Is talk submission open or closed?
Which rooms are available for talks?
Additionally, new settings types_of_talk and audiences can be added for use later in the fields type_of_talk and audience.
To define custom records, you write the same type of schema as you already did for content types or for behaviors:
Add a file controlpanel/controlpanel.py:
  1from plone import schema
  2from plone.autoform import directives
  3from zope.interface import Interface
  4
  5import json
  6
  7
  8VOCABULARY_SCHEMA = json.dumps(
  9    {
 10        "type": "object",
 11        "properties": {
 12            "items": {
 13                "type": "array",
 14                "items": {
 15                    "type": "object",
 16                    "properties": {
 17                        "token": {"type": "string"},
 18                        "titles": {
 19                            "type": "object",
 20                            "properties": {
 21                                "lang": {"type": "string"},
 22                                "title": {"type": "string"},
 23                            },
 24                        },
 25                    },
 26                },
 27            }
 28        },
 29    }
 30)
 31
 32
 33class IPloneconfSettings(Interface):
 34    talk_submission_open = schema.Bool(
 35        title="Allow talk submission",
 36        description="Allow the submission of talks for anonymous user",
 37        default=False,
 38        required=False,
 39    )
 40
 41    types_of_talk = schema.JSONField(
 42        title="Types of Talk",
 43        description="Available types of a talk",
 44        required=False,
 45        schema=VOCABULARY_SCHEMA,
 46        default={
 47            "items": [
 48                {
 49                    "token": "talk",
 50                    "titles": {
 51                        "en": "Talk",
 52                        "de": "Vortrag",
 53                    },
 54                },
 55                {
 56                    "token": "lightning-talk",
 57                    "titles": {
 58                        "en": "Lightning-Talk",
 59                        "de": "Lightning-Talk",
 60                    },
 61                },
 62            ]
 63        },
 64        missing_value={"items": []},
 65    )
 66    directives.widget(
 67        "types_of_talk",
 68        frontendOptions={
 69            "widget": "vocabularyterms",
 70        },
 71    )
 72
 73    audiences = schema.JSONField(
 74        title="Audience",
 75        description="Available audiences of a talk",
 76        required=False,
 77        schema=VOCABULARY_SCHEMA,
 78        default={
 79            "items": [
 80                {
 81                    "token": "beginner",
 82                    "titles": {
 83                        "en": "Beginner",
 84                        "de": "Anfänger",
 85                    },
 86                },
 87                {
 88                    "token": "advanced",
 89                    "titles": {
 90                        "en": "Advanced",
 91                        "de": "Fortgeschrittene",
 92                    },
 93                },
 94                {
 95                    "token": "professional",
 96                    "titles": {
 97                        "en": "Professional",
 98                        "de": "Profi",
 99                    },
100                },
101            ]
102        },
103        missing_value={"items": []},
104    )
105    directives.widget(
106        "audiences",
107        frontendOptions={
108            "widget": "vocabularyterms",
109        },
110    )
111
112    rooms = schema.JSONField(
113        title="Rooms",
114        description="Available rooms of the conference",
115        required=False,
116        schema=VOCABULARY_SCHEMA,
117        default={
118            "items": [
119                {
120                    "token": "101",
121                    "titles": {
122                        "en": "101",
123                        "de": "101",
124                    },
125                },
126                {
127                    "token": "201",
128                    "titles": {
129                        "en": "201",
130                        "de": "201",
131                    },
132                },
133                {
134                    "token": "auditorium",
135                    "titles": {
136                        "en": "Auditorium",
137                        "de": "Auditorium",
138                    },
139                },
140            ]
141        },
142        missing_value={"items": []},
143    )
144    directives.widget(
145        "rooms",
146        frontendOptions={
147            "widget": "vocabularyterms",
148        },
149    )
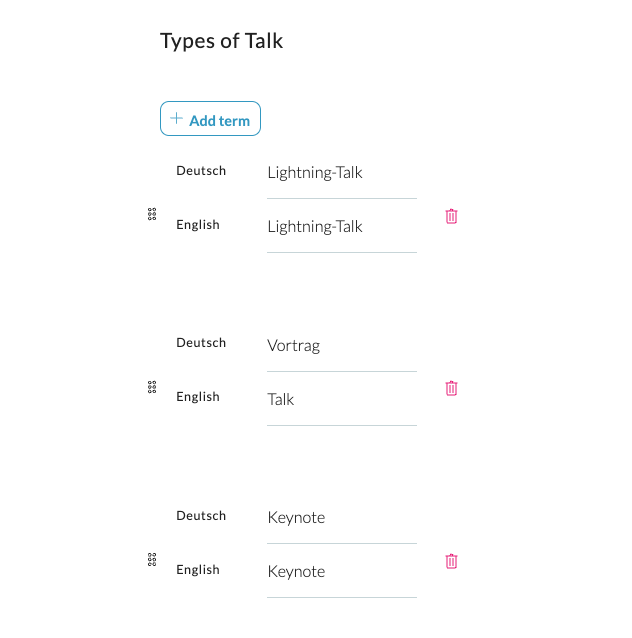
The motivation to use schema.JSONField instead of schema.List is described as follows.
The options for the types of a talk, the room and the audience may change.
A modification of the feeding vocabulary would mean that already used options are no longer available, which would corrupt the data of the concerned talks.
We can "future-proof" this vocabulary with JSONFields that store a vocabulary source in the registry.
This vocabulary is a list of dictionaries, with keys that never change, and values that may be modified when necessary.
See the default values to understand what is stored in the registry:
Example types_of_talk:
[
    {
        "token": "talk",
        "titles": {
            "en": "Talk",
            "de": "Vortrag",
        },
    },
    {
        "token": "lightning-talk",
        "titles": {
            "en": "Lightning-Talk",
            "de": "Lightning-Talk",
        },
    },
]
If the name Lightning-Talk needs to be updated to Short talks, the talks categorized as lightning talks will still display correctly.
This is because the value stored in the talks is the token lightning-talk, which remains unchanged.
A new field JSONField has been introduced.
This field is used to store JSON data for the content.
A schema defines the valid structure of the field values.
    directives.widget(
        "audiences",
        frontendOptions={
            "widget": "vocabularyterms",
        },
    )
The frontendOptions forces Volto to display on editing the field with a widget prepared for vocabulary terms.
More correct, it forces Volto to lookup the widget in Volto's widget mapping to find the corresponding widget.
The schema IPloneconfSettings is now registered for the registry.
Add the following to profiles/default/registry/main.xml.
Each field in the IPloneconfSettings schema adds a corresponding record to the registry.
<?xml version="1.0"?>
<registry
    xmlns:i18n="http://xml.zope.org/namespaces/i18n"
    i18n:domain="ploneconf.site">

  <records
      interface="ploneconf.site.controlpanel.controlpanel.IPloneconfSettings"
      prefix="ploneconf" />

</registry>
Note
The prefix allows you to access these records with a shortcut:
You can use ploneconf.rooms instead of ploneconf.site.controlpanel.controlpanel.IPloneconfSettings.rooms.
After reinstalling the package to apply the registry changes, you can access and modify these registry records as described before. Either use http://localhost:8080/Plone/portal_registry or Python:
from plone import api

api.portal.get_registry_record('ploneconf.rooms')
Note
In training code ploneconf.site, we use Python to define the registry records.
Alternatively you could add these registry entries with Generic Setup.
The following creates a new entry ploneconf.talk_submission_open with Generic Setup:
1<record name="ploneconf.talk_submission_open">
2  <field type="plone.registry.field.Bool">
3    <title>Allow talk submission</title>
4    <description>Allow the submission of talks for anonymous users</description>
5    <required>False</required>
6  </field>
7  <value>False</value>
8</record>
When creating a new vanilla Plone instance, a lot of default settings are created that way.
See plone/Products.CMFPlone to see how Products.CMFPlone registers values.
20.6. Add a custom control panel#
Now you'll add a custom control panel to edit all settings related to the package with a user-friendly interface.
To register a control panel for the frontend, add the following RegistryConfigletPanel to controlpanel/controlpanel.py.
The RegistryConfigletPanel uses the schema and will serve as a factory for a control panel configlet.
 1from plone.restapi.controlpanels import RegistryConfigletPanel
 2from zope.component import adapter
 3
 4# …
 5
 6class IPloneconfSettings(Interface):
 7    talk_submission_open = schema.Bool(
 8        title="Allow talk submission",
 9        description="Allow the submission of talks for anonymous user",
10        default=False,
11        required=False,
12    )
13
14# …
15
16@adapter(Interface, Interface)
17class PloneConfRegistryConfigletPanel(RegistryConfigletPanel):
18    """Volto control panel"""
19
20    schema = IPloneconfSettings
21    schema_prefix = "ploneconf"
22    configlet_id = "ploneconf-controlpanel"
23    configlet_category_id = "Products"
24    title = "Ploneconf Settings"
25    group = "Products"
If you want to use this control panel in Classic UI as well, see https://2022.training.plone.org/mastering-plone/registry.html#add-a-custom-control-panel, which also handles the Classic UI version.
The factory is used in controlpanel/configure.zcml for a named adapter:
1  <adapter
2    factory="ploneconf.site.controlpanel.controlpanel.PloneConfRegistryConfigletPanel"
3    name="ploneconf-controlpanel" />
Finally register in profiles/default/controlpanel.xml the configlet with Generic Setup so that it gets listed in the Site Setups panels list (often called 'control panel').
Therefore the named adapter "ploneconf-controlpanel" provides the schema for the form of the control panel configlet.
 1<?xml version="1.0" encoding="utf-8"?>
 2<object name="portal_controlpanel">
 3  <configlet action_id="ploneconf-controlpanel"
 4             appId="ploneconf-controlpanel"
 5             category="Products"
 6             title="Ploneconf Settings"
 7             visible="True"
 8  >
 9    <permission>Manage portal</permission>
10  </configlet>
11</object>
After applying the profile (for example, by reinstalling the package), your control panel configlet shows up on http://localhost:3000/controlpanel/controlpanel
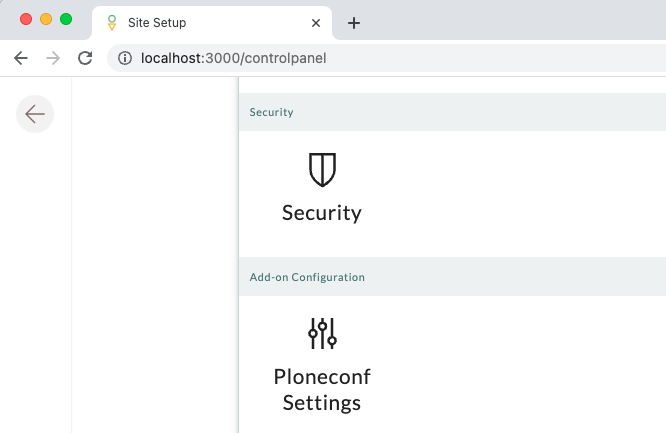
As you can see in the control panel configlet for the ploneconf.site package, the entries can be modified and reordered.
Changes are reflected in the registry because the configlet is registered with the schema of the registry fields.
Note
Frontend widgets
A short remark on the frontend widget.
We want the VocabularyTermsWidget to be applied.
Thus we specify a hint, using a so-called "tagged value", the name of the frontend widget to be applied for the three control panel fields in our backend schema.
Thus no widget registration in the frontend app is needed.
directives.widget(
    "types_of_talk",
    frontendOptions={
        "widget": "vocabularyterms",
    },
)
This is also the way you would configure a content type schema, where you may want to override the default widget.
A widget component in your frontend package would be mapped to a key "mywidget".
In your content type schema you would add a widget directive with
frontendOptions={"widget": "mywidget"}
20.7. Vocabularies#
Now the custom settings are stored in the registry and can be modified conveniently by site administrators. These options still need to be used in talks.
To achieve this, turn them into vocabularies.
Vocabularies are often used for selection fields. They have many benefits:
They enable you to separate the select option values from the content type schema. Users can edit vocabularies through the UI.
Developers can set vocabularies dynamically. The available options may vary based on existing content, the user's role, or even the time of day.
Create a file vocabularies/talk.py and write code that generates vocabularies from these settings:
 1from plone import api
 2from zope.interface import provider
 3from zope.schema.interfaces import IVocabularyFactory
 4from zope.schema.vocabulary import SimpleVocabulary
 5
 6
 7@provider(IVocabularyFactory)
 8def TalkTypesVocabulary(context):
 9    name = "ploneconf.types_of_talk"
10    registry_record_value = api.portal.get_registry_record(name)
11    items = registry_record_value.get("items", [])
12    lang = api.portal.get_current_language()
13    return SimpleVocabulary.fromItems(
14        [[item["token"], item["token"], item["titles"][lang]] for item in items]
15    )
16
17
18@provider(IVocabularyFactory)
19def AudiencesVocabulary(context):
20    name = "ploneconf.audiences"
21    registry_record_value = api.portal.get_registry_record(name)
22    items = registry_record_value.get("items", [])
23    lang = api.portal.get_current_language()
24    return SimpleVocabulary.fromItems(
25        [[item["token"], item["token"], item["titles"][lang]] for item in items]
26    )
27
28
29@provider(IVocabularyFactory)
30def RoomsVocabularyFactory(context):
31    name = "ploneconf.rooms"
32    registry_record_value = api.portal.get_registry_record(name)
33    items = registry_record_value.get("items", [])
34    lang = api.portal.get_current_language()
35    return SimpleVocabulary.fromItems(
36        [[item["token"], item["token"], item["titles"][lang]] for item in items]
37    )
The SimpleVocabulary.fromItems() is a method that takes the list of dictionaries of vocabulary terms
[
    {
        "token": "talk",
        "titles": {
            "en": "Talk",
            "de": "Vortrag",
        },
    },
    {
        "token": "lightning-talk",
        "titles": {
            "en": "Lightning-Talk",
            "de": "Lightning-Talk",
        },
    },
]
and creates a Zope vocabulary.
This SimpleVocabulary instance has methods that Plone uses to display select widgets, display the rendered content type instance according the user language, etc..
You can now register these vocabularies as named utilities in vocabularies/configure.zcml:
<utility
    name="ploneconf.types_of_talk"
    component="ploneconf.site.vocabularies.talk.TalkTypesVocabulary" />
<utility
    name="ploneconf.audiences"
    component="ploneconf.site.vocabularies.talk.AudiencesVocabulary" />
<utility
    name="ploneconf.rooms"
    component="ploneconf.site.vocabularies.talk.RoomsVocabularyFactory" />
From now on you can use these vocabulary by referring to their name, for example, ploneconf.rooms.
Note
Plone comes with many useful named vocabularies that you can use in your own projects, for example
plone.app.vocabularies.Usersorplone.app.vocabularies.PortalTypes.See plone/plone.app.vocabularies for a list of vocabularies.
We turn the values from the registry into a dynamic
SimpleVocabularythat can be used in the schema.You could use the context with which the vocabulary is called or the request (using
getRequestfromzope.globalrequest) to constrain the values in the vocabulary.
See also
Plone documentation Vocabularies.
20.8. Using vocabularies in a schema#
To use a vocabulary in a schema field, replace the attribute values with vocabulary, and point to a vocabulary by its name:
1type_of_talk = schema.Choice(
2    title='Type of talk',
3    vocabulary='ploneconf.types_of_talk',
4    required=True,
5)
Don't forget to add the new field room.
Edit content/talk.py:
 1from plone.app.textfield import RichText
 2from plone.autoform import directives
 3from plone.dexterity.content import Container
 4from plone.namedfile.field import NamedBlobImage
 5from plone.schema.email import Email
 6from plone.supermodel import model
 7from z3c.form.browser.checkbox import CheckBoxFieldWidget
 8from z3c.form.browser.radio import RadioFieldWidget
 9from zope import schema
10from zope.interface import implementer
11
12
13class ITalk(model.Schema):
14    """Dexterity-Schema for Talks"""
15
16    directives.widget(type_of_talk=RadioFieldWidget)
17    type_of_talk = schema.Choice(
18        title="Type of talk",
19        vocabulary="ploneconf.types_of_talk",
20        required=True,
21    )
22
23    details = RichText(
24        title="Details",
25        description="Description of the talk (max. 2000 characters)",
26        max_length=2000,
27        required=True,
28    )
29
30    directives.widget(audience=CheckBoxFieldWidget)
31    audience = schema.Set(
32        title="Audience",
33        value_type=schema.Choice(
34            vocabulary="ploneconf.audiences",
35        ),
36        required=False,
37    )
38
39    speaker = schema.TextLine(
40        title="Speaker",
41        description="Name (or names) of the speaker",
42        required=False,
43    )
44
45    company = schema.TextLine(
46        title="Company",
47        required=False,
48    )
49
50    email = Email(
51        title="Email",
52        description="Email address of the speaker",
53        required=False,
54    )
55
56    website = schema.TextLine(
57        title="Website",
58        required=False,
59    )
60
61    twitter = schema.TextLine(
62        title="Twitter name",
63        required=False,
64    )
65
66    github = schema.TextLine(
67        title="Github username",
68        required=False,
69    )
70
71    image = NamedBlobImage(
72        title="Image",
73        description="Portrait of the speaker",
74        required=False,
75    )
76
77    speaker_biography = RichText(
78        title="Speaker Biography (max. 1000 characters)",
79        max_length=1000,
80        required=False,
81    )
82
83    room = schema.Choice(
84        title="Room",
85        vocabulary="ploneconf.rooms",
86        required=False,
87    )
88
89
90@implementer(ITalk)
91class Talk(Container):
92    """Talk instance class"""
20.9. Adjust frontend according schema changes#
With the new key value pairs (token/title) we adjust the component accordingly:
      {content.audience?.map((item) => {
        let color = color_mapping[item.token] || 'green';
        return (
          <Label key={item.token} color={color}>
            {item.title}
          </Label>
        );
      })}
One tiny thing is still missing: We should display the room.
Modify frontend/src/components/Views/Talk.jsx an add this after the When component:
    {content.room && (
      <>
        <Header dividing sub>
          Where
        </Header>
        <p>{content.room.title}</p>
      </>
    )}
20.10. Summary#
You successfully combined the registry, a control panel, and vocabularies to enable site administrators to manage field options.
It seems like a lot, but you will certainly use dynamic vocabularies, control panels, and the registry in many of your Plone projects in one way or another.