
19. Add event dates to talks#
In this chapter you will
Enable the event behavior for talks
Display the date & time in the talk view
Check out mastering-plone-project at tag frontpage:
git checkout frontpage
Code for the end of this chapter:
git checkout events
More info in The code for the training
We need a schedule and for this we need to store the date and time when a talk will happen.
Luckily the default type Event is based on reusable behaviors from the package plone.app.event that we can reuse.
19.1. Add date fields#
Instead of adding datetime fields to the talk schema, we will use the behavior plone.eventbasic.
Enable the behavior plone.eventbasic for talks in backend/src/ploneconf/site/profiles/default/types/talk.xml.
1<property name="behaviors">
2  <element value="plone.dublincore"/>
3  <element value="plone.namefromtitle"/>
4  <element value="plone.versioning"/>
5  <element value="ploneconf.featured"/>
6  <element value="plone.eventbasic"/>
7</property>
After you activate the behavior by hand or reinstalled the add-on, you will now have some additional fields for start, end, open_end and whole_day.
19.2. Display the dates#
Now we need to update the event view to show this information.
Unfortunately displaying dates and times is not as simple as it might sound, since we have to account for different use cases that all look different.
Here are some examples of how dates might be displayed if they are full-day events, open-ended events, or events with a defined end-time.
Apr 22, 2020 from 3:00 PM to 5:00 PM
Apr 22, 2020
Apr 22, 2020 7:00 PM
Apr 22, 2020 to Apr 24, 2020
Apr 22, 2020 7:00 PM to Apr 29, 2020 8:00 PM
Now consider that dates are displayed different in other languages and it really gets complicated.
So it would be a good idea to reuse a component that already deals with these use cases. Since we use the same behavior as the default content type Event in Plone, the default event view might have what we need.
Add an event und use the React Developer Tools to inspect the component displaying the date.
The component is called When and is defined in frontend/core/packages/volto/src/components/theme/View/EventDatesInfo.jsx.
<When
  start={content.start}
  end={content.end}
  whole_day={content.whole_day}
  open_end={content.open_end}
/>
We'll reuse it in frontend/packages/volto-ploneconf-site/src/components/Views/TalkView.jsx.
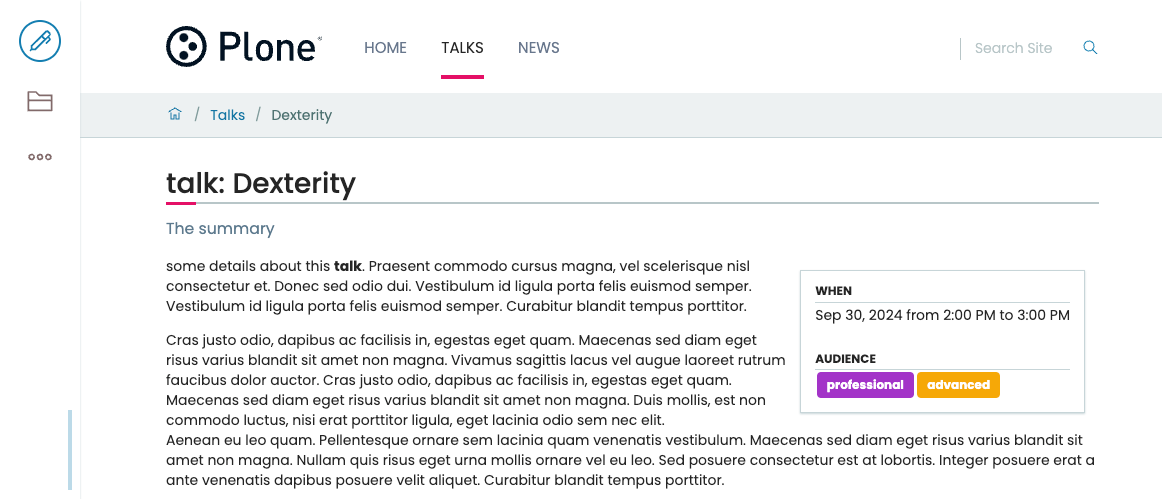
Inspired by the event view, we'll add a right-floated segment containing the date and the audience.
import { Container as SemanticContainer } from 'semantic-ui-react';
import config from '@plone/volto/registry';
import { When } from '@plone/volto/components/theme/View/EventDatesInfo';

const colorMapping = {
  beginner: 'green',
  advanced: 'yellow',
  professional: 'purple',
};

const TalkView = (props) => {
  const { content } = props;
  const Container =
    config.getComponent({ name: 'Container' }).component || SemanticContainer;
  const Image = config.getComponent({ name: 'Image' }).component;
  return (
    <Container id="view-wrapper talk-view">
      <h1 className="documentFirstHeading">
        <span className="type_of_talk">{content.type_of_talk.token}: </span>
        {content.title}
      </h1>
      {content.description && (
        <p className="documentDescription">{content.description}</p>
      )}
      <div className="ui right floated segment">
        {content.start && !content.hide_date && (
          <>
            <div className="ui dividing sub header">When</div>
            <When
              start={content.start}
              end={content.end}
              whole_day={content.whole_day}
              open_end={content.open_end}
            />
          </>
        )}
        {content.audience && (
          <div className="ui dividing sub header">Audience</div>
        )}
        {content.audience?.map((item) => {
          let audience = item.token;
          let color = colorMapping[audience] || 'green';
          return (
            <div className={`ui label ${color}`} key={audience}>
              {audience}
            </div>
          );
        })}
      </div>
      <div dangerouslySetInnerHTML={{ __html: content.details.data }} />
      <div className="ui clearing segment">
        {content.speaker && (
          <div className="ui dividing header">{content.speaker}</div>
        )}
        {content.website ? (
          <p>
            <a href={content.website}>{content.company || content.website}</a>
          </p>
        ) : (
          <p>{content.company}</p>
        )}
        {content.email && (
          <p>
            Email: <a href={`mailto:${content.email}`}>{content.email}</a>
          </p>
        )}
        {content.github && (
          <p>
            Github:{' '}
            <a href={`https://github.com/${content.github}`}>
              {content.github}
            </a>
          </p>
        )}
        <Image
          item={content}
          alt={content.speaker}
          className="ui small right floated image"
        />
        {content.speaker_biography && (
          <div
            dangerouslySetInnerHTML={{
              __html: content.speaker_biography.data,
            }}
          />
        )}
      </div>
    </Container>
  );
};
export default TalkView;
The result should look like this:
19.3. Hide fields from certain users#
Note
This chapter is about displaying, not editing. So setting values is not the topic here.
The problem now appears that speakers submitting their talks should not be able to set a time and day for their talks.
Sadly it is not easy to modify permissions of fields provided by behaviors unless you write the behavior yourself. At least in this case we can take the easy way out since the field does not contain secret information: We can simply hide the fields from contributors using CSS and show them for reviewers.
Warning
This trick does not yet work in Volto because some CSS classes are still missing from the body-tag (see plone/volto#1189). Skip ahead!
Modify frontend/theme/extras/custom.overrides and add:
/* Hide date fields from contributors */
body.userrole-contributor {
  #default-start.field,
  #default-end.field,
  #default-whole_day.field,
  #default-open_end.field {
    display: none;
  }
}

body.userrole-reviewer {
  #default-start.field,
  #default-end.field,
  #default-whole_day.field,
  #default-open_end.field {
    display: block;
  }
}
Exercise#
Find out where the event behavior is defined and which fields it offers.
19.4. Summary#
You applied an existing behavior to a content type to add new fields.
You reused an existing Volto component to display the date.
You did not have to write your own datetime fields and indexers.